
안드로이드 개발자의 창고
[29일차 Android] TextInputLayout 본문
출처 : 안드로이드 앱스쿨 2기 윤재성 강사님 수업 PPT
📖 TextInputLayout
- EditText를 보완한 View
- EditText의 속성, 이벤트, 프로퍼티 등을 그대로 사용하며 몇 가지 요소가 추가되었다.
주요 속성
| 속성 | 설명 |
| hint | 입력한 내용이 없으면 보여줄 안내 메세지. EditText와 다르게 문자열을 입력하면 상단 부분으로 올라간다. |
| counterEnabled | 입력한 글자의 수가 나타난다. |
| counterMaxLength | 지정한 글자수를 넘으면 붉은 색으로 표시해준다. |
주요 프로퍼티
| 프로퍼티 | 설명 |
| editText | TextInputLayout이 가지고 있는 EditText 객체의 주소 값 |
| error | 오류로 표시할 메시지를 설정한다. |
예제 코드
activity_main.xml
<?xml version="1.0" encoding="utf-8"?>
<LinearLayout xmlns:android="http://schemas.android.com/apk/res/android"
xmlns:app="http://schemas.android.com/apk/res-auto"
xmlns:tools="http://schemas.android.com/tools"
android:layout_width="match_parent"
android:layout_height="match_parent"
android:orientation="vertical"
tools:context=".MainActivity" >
<com.google.android.material.textfield.TextInputLayout
android:id="@+id/textInputLayout"
android:layout_width="match_parent"
android:layout_height="wrap_content"
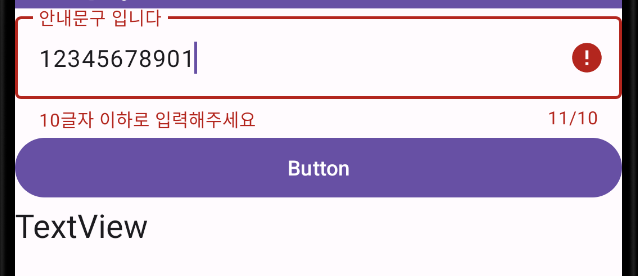
android:hint="안내문구 입니다"
app:counterEnabled="true"
app:counterMaxLength="10">
<com.google.android.material.textfield.TextInputEditText
android:id="@+id/textInputEditText"
android:layout_width="match_parent"
android:layout_height="wrap_content" />
</com.google.android.material.textfield.TextInputLayout>
<Button
android:id="@+id/button"
android:layout_width="match_parent"
android:layout_height="wrap_content"
android:text="Button" />
<TextView
android:id="@+id/textView"
android:layout_width="match_parent"
android:layout_height="wrap_content"
android:text="TextView"
android:textAppearance="@style/TextAppearance.AppCompat.Large" />
</LinearLayout>
MainActivity.kt
import androidx.appcompat.app.AppCompatActivity
import android.os.Bundle
import androidx.core.widget.addTextChangedListener
import com.test.android15_textinputlayout.databinding.ActivityMainBinding

class MainActivity : AppCompatActivity() {

    lateinit var activityMainBinding: ActivityMainBinding

    override fun onCreate(savedInstanceState: Bundle?) {
        super.onCreate(savedInstanceState)

        activityMainBinding = ActivityMainBinding.inflate(layoutInflater)
        setContentView(activityMainBinding.root)

        activityMainBinding.run{

            textInputLayout.run{

                // error = "입력 오류가 발생하였습니다"

                editText?.run {
                    addTextChangedListener {
                        if (it!!.length > 10){
                            // error = "10글자 이하로 입력해주세요"
                            textInputLayout.error = "10글자 이하로 입력해주세요"
                        } else {
                            // error = null
                            textInputLayout.error = null
                        }
                    }
                }
            }

            button.run{
                setOnClickListener {

                    // val str1 = textInputEditText.text.toString()
                    // textView.text = str1

                    // TextInputLayout으로 부터 EditText를 추출한다.
                    if(textInputLayout.editText != null) {
                        val str1 = textInputLayout.editText!!.text.toString()
                        textView.text = str1
                    }
                }
            }
        }
    }
}
코드 리뷰
- textInputLayout.run{ ... }
- // error = "입력 오류가 발생하였습니다"
- 해당 코드를 작성하면 입력 전부터 오류 발생 메세지("입력 오류가 발생하였습니다")를 표시한다.
- // error = "입력 오류가 발생하였습니다"

- editText?.run { addTextChangedListener { ... } }
- if (it!!.length > 10){ ... }
- EditText의 문자열 길이가 10이 넘으면 오류 메세지를 출력한다.
- error = "10글자 이하로 입력해주세요"
- EditText의 오류 메세지를 설정한다.
- textInputLayout.error = "10글자 이하로 입력해주세요"
- textInputLayout의 오류 메세지를 설정한다.
- if (it!!.length > 10){ ... }
 |
 |
| EditText의 오류 메세지 설정 | textInputLayout의 오류 메세지 설정 |
'Computer > Android' 카테고리의 다른 글
| [29일차 Android] CheckBox와 RadioButton (7) | 2023.06.11 |
|---|---|
| [29일차 Android] ImageView (1) | 2023.06.11 |
| [28일차 Android] LogCat (0) | 2023.06.10 |
| [28일차 Android] EditText (0) | 2023.06.10 |
| [28일차 Android] Button (0) | 2023.06.10 |
'Computer/Android' Related Articles
more
